Anúncios
Automotive suspension systems keep a car steady by controlling wheel motion and absorbing bumps. This simple link between wheels and body helps maximize tire grip on the road and protects passengers from shock.
The guide will show three ride and handling goals—isolation, holding, and cornering—and how each matters for commuting, highway cruising, and rough pavement. You’ll learn what parts do, how designs differ, and what common symptoms mean.
Think of the suspension as one part of a larger set. Chassis, steering, tires, and this system work together. Diagnosing comfort or handling issues means looking at the whole car, not a single part.
Safety note: worn parts can reduce control during braking and steering. Spotting warning signs early helps you avoid bigger problems and keep driving with confidence and stability.
What a Suspension System Does for Your Vehicle on Today’s Roads
On modern roads, the suspension system keeps each tire in steady contact so grip stays predictable. That steady contact is the foundation for safe steering and consistent braking.
Anúncios
- Road input → wheel motion: bumps and dips push on a tire, causing the wheel to move.
- Suspension travel: springs and dampers allow controlled wheel movement so the tire stays planted.
- Result: continuous contact maximizes friction with the road surface, improving control and traction.
Maximizing friction means real gains: steadier steering, more predictable stops, and fewer traction losses over bumps. When each wheel keeps contact, the vehicle responds as the driver expects.
Chassis, body, and frame interaction
The chassis is the understructure that carries the body while mounting the steering and the suspension. The system filters impacts so energy is absorbed before it reaches the frame and passengers.
Anúncios
If the suspension cannot absorb energy effectively, the ride becomes harsh, the body feels unsettled, and driver confidence drops. Load, speed, and rough pavement increase these demands, which is why modern designs balance comfort and control for a comfortable ride.
For more detail on how these elements work together, see understanding your vehicle suspension system.
The Ride and Handling Basics: Road Isolation, Road Holding, and Cornering
Three clear outcomes shape how a vehicle feels on the street: traveling smoothly over rough pavement, keeping tires planted, and tracking cleanly through turns. Each goal links to what a driver senses in the seat and at the wheel.
Road isolation for a more comfortable ride over rough road conditions
Road isolation means the cabin stays calm while the wheels absorb bumps. Good isolation improves passenger comfort without making the vehicle feel disconnected or floaty.
How you notice it: fewer jolts, less fatigue on long trips, and a steady posture in the seat.
Road holding to keep wheels in contact for safe braking and steering
Road holding keeps the tires in contact so steering and braking stay effective. If the wheels lose contact, control and stopping power fall instantly.
How you notice it: skittish behavior over mid-corner bumps or a feeling that the vehicle drifts when you brake.
Cornering control to reduce body roll and improve stability
Cornering control limits body roll and manages weight transfer so the vehicle follows the intended path. That makes turns feel predictable and confidence high.
How you notice it: excessive lean in turns, uneven weight shift, or a sloppy feel when changing direction quickly.
- Define the three goals and feel behind the wheel.
- Evaluate by watching for lean, skittishness, or a busy ride.
- Later sections show how springs, shocks, geometry, and sway bars influence these targets.
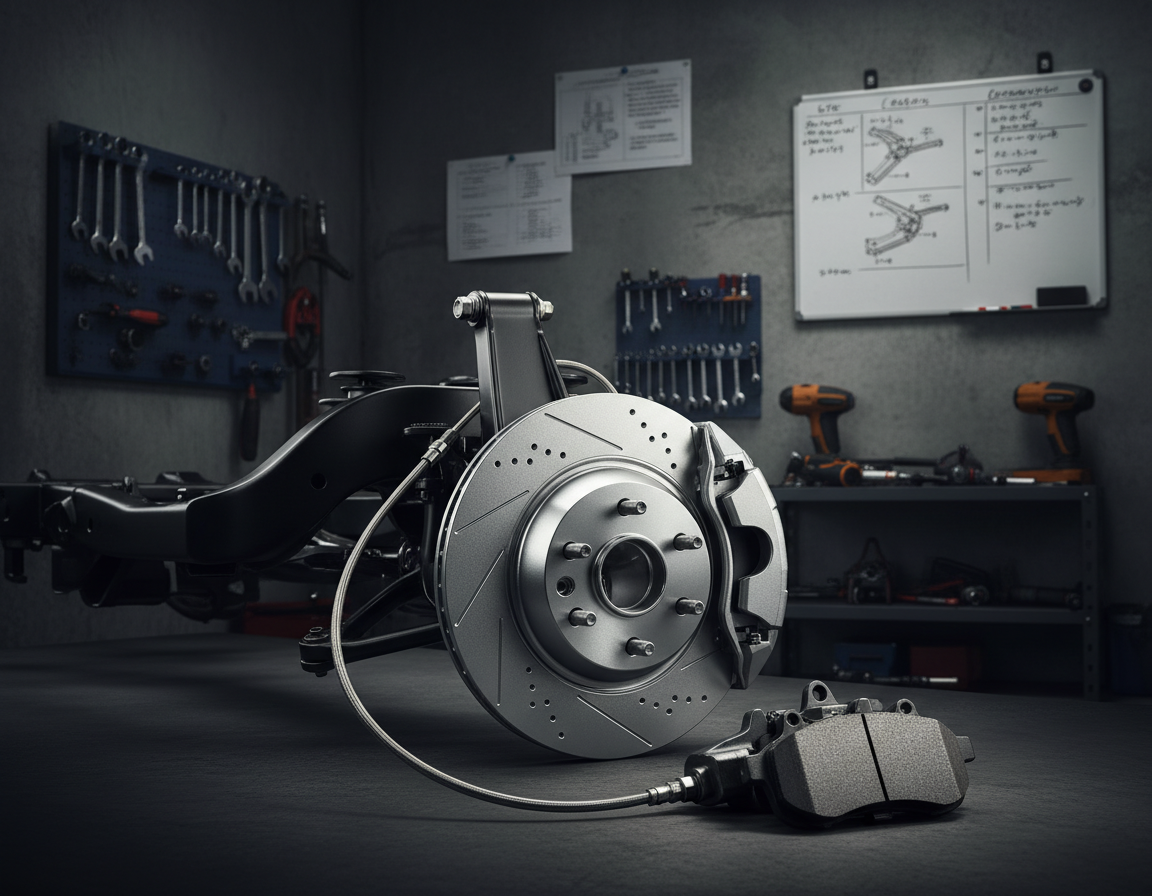
Key Components Inside Automotive Suspension Systems
Several key components work together to control ride, absorb impacts, and carry forces into the chassis. Below are the main parts and what each contributes to ride, handling, and safety.
Springs: coil, leaf, and torsion bar roles
Springs support vehicle weight and set ride height. Coil springs are common on cars for compact packaging and consistent travel.
Leaf springs appear on trucks and older designs; they can locate the axle while carrying heavy loads. Torsion bars twist to act as a spring where space or adjustment is needed.
Shock absorbers and damping
Shock absorbers control spring motion by forcing fluid through small valves. That damping tames bounce and reduces uncontrolled vibrations.
Smaller valves give a firmer, sportier feel. Larger passages yield a smoother ride on rough pavement.
Struts and structural damping
Strut assemblies combine damping with a structural mount. MacPherson struts save space by acting as both shock and locating member in many front ends.
Control arms, links, and load paths
Control arms and support arms position the wheel and manage travel. Links route loads from the wheel into the frame while keeping geometry in check.
Ball joints and diagnostic clues
Ball joints allow steering and suspension motion. Load-carrying joints sit under spring-loaded links; follower joints do not. Worn ball joints often cause clunks or uneven tire wear.
Stabilizer bars, end links, and bushings
Stabilizer bars reduce body lean in turns. End links and bushings connect the bar to arms; worn parts can create knocking on rough roads.
- Job descriptions: springs = support, shocks = control motion, struts = structure + damping.
- Loads: control arms and links steer force into the chassis safely.
- Safety cue: noisy links or sagging springs signal inspection.
How Springs and Dampers Work Together to Create Comfort
When a wheel hits a bump, the spring stores energy and the damper controls how that energy leaves the system.
Why a car would bounce dangerously without proper damping
Without dampers, the spring keeps releasing energy back and forth. That causes uncontrolled bouncing at speed.
Danger: repeated rebound reduces tire contact and worsens steering and braking control.
Constant-rate vs variable-rate coil springs
Constant-rate coil springs give even support through travel. They feel predictable whether the car is empty or loaded.
Variable-rate coil springs change stiffness as they compress. That lets the spring offer a softer ride unloaded and firmer support under heavy loads.
How shock valving stiffness changes ride feel
Shock valving controls flow of fluid through orifices. Smaller passages raise damping and make the ride firmer and sportier.
Larger passages let fluid move easier, so the shocks feel smoother and absorb more vibrations into the chassis.
- Partnership: springs carry weight and absorb impacts; dampers control compression and rebound speed.
- Symptoms: too soft damping → floaty feel; too stiff → harsh ride and more vibrations in the cabin.
- Takeaway: comfort is a balance—soft springs alone don’t keep a car settled; matched damping does.
| Component | Primary job | Typical effect on ride |
|---|---|---|
| Constant-rate coil | Even support through travel | Predictable ride height, consistent behavior |
| Variable-rate coil | Progressive stiffness under load | Soft unloaded ride, firmer with cargo/passengers |
| Shock valving (stiff) | Restricts fluid flow | Firmer, sportier control; less body motion |
| Shock valving (soft) | Allows easier fluid flow | Smoother feel; more transmitted vibrations |
Suspension System Designs You’ll See in Modern Vehicles
Modern vehicles use several common designs to balance load capacity, comfort, and handling. You can broadly spot types by whether the wheels share an axle or move independently.
Dependent suspension with a rigid axle
Rigid-axle designs tie the wheels together on a single axle. That setup is durable and carries heavy loads well.
It’s common on trucks and off-road vehicles because the axle locates the wheel and resists twisting under high loads.
Independent suspension for smoother ride and better handling
Independent layouts let each wheel move on its own. That reduces the effect when one wheel hits a bump.
The result is improved comfort and steadier steering on uneven roads.
Multi-link: tuning geometry for traction and precision
Multi-link designs use several arms to control wheel motion in multiple directions. They let engineers tune toe, camber, and roll behavior.
Example: the Cadillac CT6 rear uses a 5-link setup with a toe adjust link to refine handling and NVH.
Double wishbone, air, and leaf spring options
Double wishbone setups give precise camber control for predictable cornering and tire contact.
Air springs add adjustable ride height and automatic leveling for changing loads or towing, but they cost more to service.
Leaf springs remain a durable choice for trucks and SUVs; they locate the axle while handling heavy cargo and towing duties.
Match the type to your needs: daily comfort, heavy loads, or sporty handling to pick the right design for ride, steering, and stability.
How Suspension Geometry and Steering Components Affect Stability
Suspension geometry and steering parts set how a car holds a straight line and reacts at the wheel.

Key steering linkages and toe control
Most modern vehicles use rack-and-pinion steering. Tie-rod ends connect the rack to the steering arms and set toe. Correct toe keeps the wheel tracking straight and preserves tire life.
Torn dust boots on tie rods let grit in and speed wear. That causes loose steering, vague feel, or sudden alignment drift.
Knuckles, arms, and alignment impact
The knuckle and steering arm form the pivot between link and wheel. Small angle changes in arms translate to larger camber or toe shifts at speed.
Those shifts reduce high‑speed stability and increase steering corrections from the driver and the chassis.
Torque steer and performance strut design
Torque steer is a pulling sensation under hard acceleration in some FWD cars. It happens when unequal drive forces twist the wheel steer angle.
Performance strut designs like GM’s HiPer Strut shorten the spindle and cut torque steer, steering shake, and camber loss. This design improves cornering linearity and overall steering feel without a full body redesign.
- Geometry means how links, arms, and knuckles align to keep the tire oriented to the road.
How to Spot Suspension Wear That Hurts Handling and Comfort
A subtle tug at the wheel or a new clunk over bumps often signals parts near the end of their life. Catching these signs early helps preserve ride comfort and vehicle control.
Pulling, steering vibrations, and reduced control
Pulling to one side can mean worn links, a shifted alignment after an impact, or uneven tire pressure. This reduces straight-line control and safety.
Steering wheel vibrations at certain speeds often point to worn damping in a strut or imbalance at the wheel. It feels worse when the damping cannot tame oscillation.
Clunks, a low corner, and rising bumpiness
Clunking over uneven pavement usually comes from worn bushings or failing sway bar end links. These noises indicate loose load paths and quicker wear.
If one corner sits low, a broken spring or collapsed strut is likely. Lower ride height changes handling and braking balance.
Irregular tire wear as a clear tell
Feathered or cupped tires often signal alignment or damping problems. Ignoring uneven wear speeds up replacement and worsens handling and comfort.
“If you feel new pulls, noises, or bumps, have a trained technician inspect the car—early fixes prevent bigger failures.”
| Symptom | Likely cause | Recommended action |
|---|---|---|
| Pulling to one side | Worn link, alignment shift, or tire pressure | Check pressure, inspect links, perform alignment |
| Steering vibrations | Worn strut damping or wheel imbalance | Inspect struts, balance wheels, road test |
| Clunking over bumps | Bushed joints or sway bar end links | Replace bushings/links, retest |
| Corner low / increased bumpiness | Broken spring or weak shock/strut | Replace spring/strut, verify ride height |
How to Maintain and Protect Your Suspension for a Stable, Comfortable Ride
Routine maintenance keeps a car steady and avoids surprises on the road. Make quick visual checks part of your schedule so small faults do not become big repairs.
Inspection habits: boots, bushings, ball joints, shocks, and struts
Look for torn boots, cracked bushings, leaking shocks, and play at ball joints. A torn tie‑rod boot lets dirt in and speeds wear on the steering link and wheel components.
Tip: Lift each corner and check by hand for free play or obvious leaks. Catching wear early protects the chassis and frame mounts.
Alignment checks after potholes, collisions, or noticeable ride changes
After a hard hit or a change in ride feel, get an alignment. Misalignment increases uneven tire wear and stresses control arms and other links.
Service best practices and when to involve a trained technician
When replacing links or bushings, tighten control arms at ride height to avoid bushing preload and premature tearing. Proper torque protects the chassis and keeps travel predictable.
“If steering or ride quality changes, have a trained technician inspect safety-critical parts—early diagnosis saves money and risk.”
| Action | What to check | When to call a pro |
|---|---|---|
| Visual inspection | Torn boots, leaking shocks, cracked bushings | If parts are damaged or play is obvious |
| Hands-on check | Ball joints, tie rods, wheel play | When there is clunking or loose feel at the wheel |
| Post-impact service | Alignment, control arm torque, frame mounts | After potholes, curb strikes, or collisions |
Conclusion
Good ride quality and steady handling start with parts that keep wheels tracking the road. The suspension controls how a car absorbs impacts, how tires hold grip, and how the vehicle stays stable through turns.
Remember the three fundamentals: road isolation for comfort, road holding for steady grip, and cornering control for confident handling. Springs, shocks/struts, arms and links, ball joints, and sway bars each play a clear role in those outcomes.
Different types—dependent, independent, multi-link, double wishbone, air, and leaf—balance load, comfort, and handling goals. Act on warning signs like pulling, vibrations, clunks, a low corner, or uneven wear.
Action plan: inspect regularly, get alignments after impacts, follow service best practices, and consult a trained technician when safety is at stake. For a detailed guide, see our detailed guide.